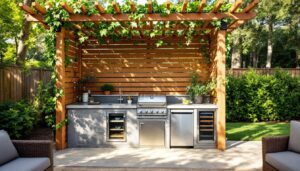
An L-shaped outdoor kitchen layout is one of the smartest choices for homeowners looking to build a functional cooking space that doesn’t waste a single inch. Unlike a straight-line setup, an L-shape creates natural work zones, improves traffic flow, and gives you the kitchen triangle, that sweet spot where your grill, sink, and prep area work together seamlessly. Whether you’re planning a simple grilling station or a full outdoor culinary hub, understanding how to design and build an L-shaped outdoor kitchen sets you up for years of entertaining and cooking outdoors. This guide walks you through the essentials: layout planning, component selection, material durability, and the actual build process.
Table of Contents
ToggleKey Takeaways
- An L-shaped outdoor kitchen layout maximizes corner space, creates an efficient work triangle between grill, sink, and prep counter, and improves traffic flow compared to straight or scattered setups.
- Essential components include a grill with 35,000–40,000 BTUs, at least 36 inches of counter depth on either side, weatherproof storage, and optional side burners or mini fridges for added functionality.
- Select durable outdoor materials like stainless steel, porcelain tile, or quartz for countertops; avoid standard plywood and use marine-grade or pressure-treated wood with protective sealing every 2–3 years.
- Plan your L-shaped outdoor kitchen layout by measuring constraints (shade, wind, utilities), checking counter height at 34–36 inches, and keeping the corner intersection accessible to avoid foot-traffic bottlenecks.
- Secure local permits before construction if your outdoor kitchen includes permanent utilities like gas, water, or electrical lines, and follow a systematic build process starting with site preparation and concrete pad installation.
- Invest in a solid foundation with a 4-inch concrete pad, overbuilt support for the 100–200 pound grill, and stainless-steel hardware throughout to prevent rust and ensure long-term durability in outdoor conditions.
Why Choose an L-Shaped Outdoor Kitchen Layout
An L-shaped outdoor kitchen layout solves real problems that straight or scattered setups don’t. First, it maximizes corner space, typically the hardest area to use in a yard, by turning it into an asset instead of wasted real estate. The corner becomes your natural gathering point, and guests naturally know where the action is.
Second, the L-shape creates the classic kitchen work triangle: grill, sink, and prep counter positioned so you’re not running laps between stations. A few steps, not thirty. This matters during a dinner party when you’re juggling a ribeye and side dishes. Third, an L-shaped design provides two distinct work surfaces that can face different directions, one side might face your deck or patio, the other your garden or open yard. This flexibility lets you position seating and traffic flow the way you want them.
For smaller yards, the L-shape also feels less bulky than a giant U-shaped or island setup. It fits naturally into corners where fences or landscaping already exist. And structurally, corner footings are solid, you’re not cantilevering appliances out into open space.
Essential Components and Equipment for Your L-Shaped Setup
Your L-shaped outdoor kitchen needs a core set of components: a grill, a prep or serving counter, a sink (if you’re running water), storage cabinets, and possibly a mini fridge or side burner. Start with the grill, it’s usually the largest piece and drives the layout. Measure the space where it’ll sit, then work backward to plan counter depths and lengths.
Counter space should run at least 36 inches deep on either side of the grill to give comfortable prep and plating room. Island codes vary, but most jurisdictions recommend 24–30 inches of clearance in front of the grill for safe operation. Use this as a minimum.
Storage is easy to overlook until you’re six months in and have nowhere to stash propane tanks, utensils, or serving dishes. Plan for weatherproof stainless-steel cabinets or purpose-built outdoor storage below the counter. Avoid particle board or MDF, they swell and rot in moisture.
Water and gas lines add cost and complexity. If you’re not running utilities (many DIYers start with a portable grill and no sink), you save thousands. But if you’re putting in permanent infrastructure, check your local building code, you’ll likely need licensed plumbers and electricians, and probably permits.
Cooking Appliances and Grilling Options
Your grill is the star. Built-in stainless-steel or cast-iron grates are standard: look for at least 35,000–40,000 BTUs of heat output if you want to sear properly. Propane is simpler for DIY (no gas line), but natural gas is cleaner and cheaper long-term if available. Some design experts recommend specific appliance layouts for outdoor kitchens, so research your grill style before committing to cabinet dimensions.
Side burners let you boil pasta or heat sauce without using the main grill. They’re nice but not essential. Mini fridges work great for drinks and prepped items, though they consume more power than indoor units, plan for a dedicated 20-amp outdoor circuit. A rotisserie or smoker adds capability, but treats them as secondary: they fit in or beside the L-shape, not as a core component.
Design and Layout Planning Tips
Start by measuring your outdoor space and identifying constraints: shade, wind direction, utility lines, and drainage. An L-shaped kitchen placed in a windswept corner will lose heat and push grease smoke toward seating, not ideal. Position the grill away from the house if possible, or use a hood or screen to manage smoke.
Sun matters too. Full afternoon sun means you’re grilling in the heat of the day. Partial shade from a pergola or umbrella is a nice bonus, but don’t rely on it. Your cooking surface should be accessible year-round.
Counter height is 34–36 inches (standard kitchen height is 36). This ensures you’re not bent over, and it matches most portable outdoor grills. If you’re building cabinets, build to this spec from the start.
The corner where the two legs of the L meet is critical. Make the corner accessible: don’t trap it with a grill or sink. Leave it open or use it for a corner shelf or small sink. This is where people naturally congregate, and you don’t want to force foot traffic or create a bottleneck.
kitchen design inspiration from The Kitchn for small-space solutions and workflow ideas, many translate directly to outdoor layouts. Sketch your design on graph paper or use a simple digital tool. Note appliance dimensions, counter lengths, and walking paths. A 15-minute sketch beats a day of regret when your grill doesn’t fit.
Material Selection and Durability Considerations
Outdoor kitchens live in the weather. Materials that work indoors fail fast outside. Start with the countertop. Stainless steel is durable, easy to clean, and won’t rot, but it shows fingerprints and gets hot in the sun. Granite or natural stone looks luxe and handles heat well but requires sealing every 1–2 years and can crack in freeze-thaw cycles if not properly sealed. Porcelain tile or quartz offer a good middle ground: they’re low-maintenance, colorfast, and handle temperature swings better than natural stone. Avoid wood countertops outdoors unless they’re sealed annually, they’ll cup, split, and eventually fail.
Cabinet frames should be stainless steel, galvanized steel, or marine-grade plywood with aluminum faces. Standard plywood or MDF absorbs moisture and swells. If you’re building with wood (for budget reasons), use exterior-grade pressure-treated lumber, paint it with marine-grade polyurethane, and plan to repaint every 2–3 years.
For the back wall or sides, stacked stone or shiplap siding looks great and provides a visual anchor. Make sure it’s rated for exterior use and that you seal it annually. Stainless-steel panels work too if you want a modern, industrial look.
Fascias and trim should be stainless steel, aluminum, or paint-grade composite material. Avoid galvanized zinc, it weathers unevenly. Budget for sealing or repainting every other year, no matter what you choose. Outdoor exposure is unforgiving, and sweat the details upfront or deal with rust, rot, or staining later.
Installation and DIY Build Steps
Before you dig or build, secure any required permits. In most jurisdictions, an outdoor kitchen with permanent utilities (gas, water, electrical) requires a permit. A simple grilling station without hookups may not, but check your local code. Permits aren’t fun paperwork, but they protect your property value and ensure the work is safe.
Step 1: Prepare the Site
Clear and level the ground where your L-shape will sit. Use a level and shim as needed. Outdoor kitchens don’t need a full concrete pad if the ground is solid and drains well, but a reinforced pad under the grill is smart, it prevents settling and keeps the grill stable. Pour a 4-inch concrete pad at least 12 inches wider than the grill footprint.
Step 2: Frame the Base Structure
Build a frame using pressure-treated 2×4 lumber or galvanized steel. Keep the legs 16 inches on center (standard framing). Attach brackets and use exterior-grade screws or bolts, never nails. Nails work loose. Check for square using a 3-4-5 triangle (measure 3 feet on one side, 4 on the other, diagonal should be 5, if not, it’s not square).
Step 3: Install Countertop Support
Frame the countertop support with blocking and joists. Make sure the grill support is overbuilt, your grill will weigh 100–200 pounds, plus food and people leaning on the counter. Use a plywood substrate rated for outdoor use (not interior CDX). Let it acclimate for 2 weeks before installing tile or stone.
Step 4: Install Countertop Material
If using tile, lay out a dry run first. Use exterior-grade mortar and grout, and seal everything after curing. If using stone or quartz, use adhesive rated for outdoor use and let cure fully (typically 48 hours) before use. Don’t rush this step.
Step 5: Set the Grill and Appliances
Position the grill and secure it according to manufacturer specs, usually bolted to the base or sitting in a built-in frame. Leave clearance around it for heat circulation and cleaning. Check all gas or electrical connections if applicable.
Step 6: Finishing Touches
Add side panels, trim, and hardware. Use stainless-steel screws and hardware everywhere, regular steel will rust. Paint or seal any wood with marine-grade product. Plan on a professional electrician if you’re running a 240V line to a fridge or cooktop: don’t DIY high-voltage work.
Safety & Tools: Wear safety glasses when drilling or grinding stainless steel (shards are sharp), work gloves when handling stone or metal edges, and dust mask when mixing mortar. Rent a table saw or miter saw if you’re cutting tile, a handheld grinder works but is slower and messier. For the concrete pad, rent a concrete mixer or hand-mix small batches.
Conclusion
An L-shaped outdoor kitchen is a practical, scalable project that grows with your needs. Start simple, a grill and counter, and add a sink, fridge, or side burner later. Focus on solid footings, durable materials, and smart layout before you worry about aesthetics. The real value isn’t the Instagram moment: it’s having real entertaining space that works and holds up for years. Plan once, build right, and you’ll be grilling like a pro for decades.