A small outdoor kitchen doesn’t mean small ambitions. Pairing a compact cooking setup with a pergola creates a shaded, functional space that extends your home’s livable footprint without eating up your entire backyard. Whether you’re hosting weekend grills or carving out a quiet morning coffee spot, a pergola-covered outdoor kitchen protects your investment, adds resale value, and transforms a basic patio into a genuine outdoor living area. This guide walks you through planning, selecting equipment, and building a setup that actually works for your space and budget.
Table of Contents
ToggleKey Takeaways
- A small outdoor kitchen with pergola extends your home’s livable space while protecting appliances from UV damage and rain, adding both function and resale value.
- Optimal layout for a small outdoor kitchen is L-shaped or galley-style (roughly 8 by 12 feet), requiring minimum 4 feet of counter space and 3-foot clearances around the grill for safety.
- Choose compact appliances like a 17-22 inch built-in grill and beverage cooler instead of full-size units to avoid dominating limited yard space and reduce rust and maintenance.
- A realistic budget for a small pergola-covered outdoor kitchen ranges from $3,000 to $8,000, with concrete, posts, and beams accounting for the bulk of costs.
- Proper pergola assembly requires post footings dug 24-30 inches deep (below frost line) set in concrete, level beams, and 12-18 inch-spaced slats to balance shade and airflow.
- Annual maintenance including bolt checks, countertop resealing, and winterization in cold climates ensures your outdoor kitchen structure remains safe, functional, and weather-resistant for years.
Why Add a Pergola to Your Outdoor Kitchen
A pergola does more than look good. It filters sunlight, reducing glare and heat on your cooking surface and guests, which keeps you comfortable during midday cooking. It also protects appliances and countertops from UV damage and rain, extending their lifespan significantly.
You’ll also gain practical shade for food prep and serving. Unlike a solid roof, a pergola’s slats allow air circulation, preventing the stuffy, trapped-heat feeling of a fully enclosed space. The filtered light also creates an inviting atmosphere, less harsh overhead sun, more ambiance.
From a design angle, a pergola frames your outdoor kitchen, giving the space definition and intentionality. It tells visitors, “This area is special: I invested in it.” That visual boundary also helps contain the cooking zone, keeping smoke, splatter, and heat a bit more contained. And if you add climbing vines or shade cloth later, you increase cooling passively without running a fan or AC unit.
Essential Design and Layout Considerations
Before buying a single post, understand what you’re working with. Measure your space carefully, both width and length, and account for clearances. You’ll need at least 4 feet of counter space for basic prep, and if you’re installing a grill, ensure there’s 3 feet of clear space on either side for safety and movement.
Consider foot traffic flow. Your outdoor kitchen shouldn’t block the path from house to patio or create a bottleneck near seating. Position the grill so the cook isn’t facing the sun or a wall: they should see guests and the house entrance.
Check your local building codes before finalizing dimensions. Some jurisdictions require permits for structures over 200 square feet or attached to the house. Others have setback rules from property lines. Call your city or county planning department, a 10-minute phone call beats redoing work later.
Think about utilities too. Is there a gas line nearby for a grill? Where’s the nearest GFCI outlet for small appliances? Planning these rough-ins now prevents expensive rerouting.
Space Planning and Dimensions
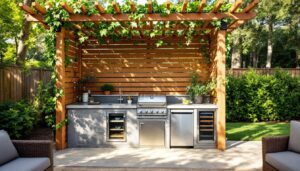
For a small outdoor kitchen, aim for an L-shaped or galley layout (roughly 8 by 12 feet with the pergola overhead). This gives you counter on two sides without dominating the yard.
Minimum dimensions by function:
- Grill zone: 3 feet wide, 2 feet deep (plus 3-foot clearances on both sides)
- Counter/prep: 4 feet long, 2 feet deep minimum
- Mini fridge or cooler slot: 2 feet wide, 2 feet deep
- Pergola coverage: Extend at least 2 feet beyond your counters on all sides to provide shade and weather protection
If you’re tight on space, go vertical. Wall-mounted shelving, hanging pot racks, and a compact prep sink save precious counter real estate. A 16-inch-wide prep station fits against a wall and doesn’t feel cramped.
Selecting Appliances and Equipment for Compact Kitchens
Don’t default to full-size appliances, they’ll dominate a small space and collect rust. A 17-inch to 22-inch built-in grill is plenty for a family gathering and fits neatly into a counter frame. Pair it with a compact gas or charcoal side burner (about 12 inches wide) for sauces or boiling water.
Skip the full-size fridge if space is tight: instead, use a built-in beverage cooler (15 to 24 inches wide) for drinks and cold prep items. These are cheaper, smaller, and more durable outdoors than a standard mini-fridge.
For a prep sink, a 10 to 15-inch stainless steel drop-in works fine and drains right through your counter. Hand pump faucets are cute, but a low-pressure RV-style faucet (around $30 to $50) is more practical and less likely to freeze in winter.
Choose weather-resistant countertop material. Stainless steel is durable but shows fingerprints: concrete with a sealer is budget-friendly and can be stained or polished: natural stone (granite, travertine) is beautiful but needs sealing. Avoid untreated wood and composite decking, UV and moisture will ruin them quickly.
All gear should be rated for outdoor use. Stainless steel components are standard: anything exposed should resist rust and corrosion. Check product reviews specifically for outdoor longevity, not just looks.
Budget-Friendly DIY Installation Steps
A realistic budget for a small pergola-covered outdoor kitchen runs $3,000 to $8,000, depending on materials and whether you DIY the structure versus hiring help. Concrete pads, posts, and beams account for the bulk: appliances and counters are extra.
Materials checklist:
- Concrete and post footings
- Pressure-treated or cedar 4×4 posts (for uprights)
- 2×8 or 2×10 beams (for main supports)
- 2×4 slats for the pergola canopy
- Counter substrate (plywood, concrete backer board)
- Countertop material (tile, sealed concrete, stone)
- Hardware (lag bolts, carriage bolts, post brackets)
- Deck screws (exterior grade, 2.5 to 3.5 inches)
Basic tools you’ll need:
- Level, tape measure, circular saw (or miter saw for clean cuts)
- Drill-driver with bits for concrete and wood
- Post-hole digger or auger (renting saves money)
- Shovel, wheelbarrow
- Safety gear: goggles, work gloves, dust mask, steel-toe boots
If you don’t own a miter saw, rent one for a day ($20–$30) rather than buying. Cleaner crosscuts on beams make assembly easier.
Pergola Assembly and Mounting
Start with footings. Dig post holes at least 24 to 30 inches deep (below your frost line, check local frost depth requirements). Frost heave will wreck a structure, so don’t skimp here.
Set 4×4 posts in concrete, using a level to ensure they’re plumb. Let concrete cure 48 hours before adding weight.
Attach beams (2×8 or 2×10) to the posts using lag bolts or carriage bolts with washers and lock nuts. Drill pilot holes first to avoid splitting wood. Beams should sit level: double-check with a 4-foot level.
Lay 2×4 slats perpendicular to beams, spacing them 12 to 18 inches apart for partial shade. Tighter spacing = more shade but less airflow: wider spacing = more light but less shade. Screw slats down with 3-inch exterior screws, one per beam intersection.
If attaching to your house, lag the beam to rim joist or band board using heavy-duty brackets. Don’t rely on siding: remove siding at the connection point and bolt into solid framing.
This is structural work. If you’re not comfortable with level-setting, bolt torque, and load distribution, hire a handyperson or contractor for the pergola frame. A wobbly structure is a liability and a headache to fix later. Recent projects featured by Urban Oasis Landscape Design show how thoughtfully designed outdoor kitchens integrate with pergolas to create cohesive, functional spaces.
Once the frame is solid, build your counter box underneath. Frame it with pressure-treated 2×4s, adding diagonal bracing for rigidity. Screw a layer of exterior-grade plywood to the frame, then top it with backer board and your chosen countertop material.
Finishing Touches and Maintenance
Paint or stain your pergola to match your home’s trim or go bold with a contrasting color. Use exterior-grade paint or stain rated for your climate: reapply every 2 to 3 years depending on sun exposure. Cedar or redwood can be left to weather naturally (they’ll turn silver-gray), but pressure-treated lumber should be sealed or stained to extend its life.
Cables or shade cloth can be added later without rebuilding the frame. Retractable shade cloth lets you adjust coverage seasonally. In summer, you’re grateful for it: in winter, you might want full sun.
Add outdoor lighting, low-voltage LED strips under beams or hanging lanterns, so you can cook and entertain into the evening. String lights add ambiance without hard wiring: solar options skip the electrician cost. But, if you’re running a dedicated outlet for a mini-fridge or countertop mixer, hire a licensed electrician. Outdoor circuits need GFCI protection and proper gauge wiring.
For countertops, reseal stone or concrete annually. Stainless steel and tile are lower-maintenance but should still be cleaned regularly and dried after rain to prevent mineral staining.
Appliances need winterizing in cold climates. Drain water lines, cover the grill, and store propane tanks safely indoors. In mild climates, a fitted cover protects from UV and dust. Resources like The Spruce and Hunker offer detailed seasonal maintenance checklists that apply to most outdoor kitchen setups.
Check bolts and hardware once a year. Wind and thermal cycling loosen fasteners over time. A quick pass with a socket wrench prevents collapse and rust creep.