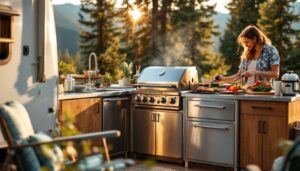
An L-shaped outdoor kitchen is one of the most practical layouts for backyard cooking. This configuration uses two perpendicular walls or runs of countertop to maximize workspace while adapting to tight corners or open entertaining areas. Whether you’re working with a small urban patio or sprawling suburban yard, an L-shaped design lets you zone different tasks, grilling, prep, and cleanup, without everyone bumping elbows. This guide walks through why homeowners choose this layout, what materials hold up outdoors, and specific setups tailored to your space and budget.
Table of Contents
ToggleKey Takeaways
- L-shaped outdoor kitchen layouts maximize counter space while keeping your cooking zone compact and naturally zoned for different tasks like grilling, prep, and cleanup.
- Plan site conditions carefully, including sun exposure, drainage, and utility access (water, gas, and electrical lines) before building to avoid costly retrofitting.
- Choose durable materials suited to weather: stainless steel for framing and appliances, sealed concrete or granite for countertops, and marine-grade hardware to resist rust and corrosion.
- Build your L-shaped outdoor kitchen 3–4 inches higher than standard indoor counters (about 39 inches) to reduce strain when standing and reaching across the grill.
- Start with essential appliances—a 4-burner grill and a compact prep sink—then add refrigeration, side burners, and bar seating based on your space and entertaining needs.
- Budget $3,000–$8,000 for a basic setup or $15,000+ for high-end components, and always obtain permits and follow local building codes to ensure safety and compliance.
Why Choose an L-Shaped Outdoor Kitchen Layout
The L-shaped footprint solves a real problem: it gives you more usable counter space than a straight run while keeping the kitchen compact enough for most backyards. One leg typically holds your primary cooking appliance, a grill, smoker, or cooktop, while the other leg handles prep surfaces, a sink, or coolers. This separation keeps heat and splatter away from where you’re chopping vegetables or mixing drinks.
An L-shaped kitchen also defines the space naturally. Instead of spreading appliances across a vague open area, you create a focused work zone that guests instinctively understand. People linger nearby but know not to interfere with active cooking. The layout scales well, too: you can build a modest 6-by-8-foot setup for a couple or expand to 12-by-10 feet for entertaining crowds.
Corner placement works in your favor. Many backyards have an unused corner or fence line, exactly where an L-shaped kitchen thrives. You’re not sacrificing the middle of your yard or creating an island that dominates the view from the house.
Key Design Elements for L-Shaped Outdoor Kitchens
Before you buy materials, think about three things: sun and shade, drainage, and access to utilities.
Sun exposure matters. If your kitchen sits in full sun, your countertops will get scaldingly hot in summer, and you’ll want shade cloth or an overhead structure nearby. If it’s in deep shade, you might want a covered roof for rainy days but have less cooling stress on appliances. Plan sightlines too, do you want views from the house, or is privacy better?
Drainage prevents water from pooling under appliances. A slight slope away from the kitchen, or raised footings, keeps moisture from rotting wood supports or rusting steel legs. Run water and gas lines to the site before you build: digging under an installed kitchen invites disaster.
Utility access is non-negotiable. Outdoor kitchens need water supply (from your house’s main line or a dedicated spigot), gas lines (if you’re using a built-in cooktop or grill), and electrical circuits rated for outdoor use. Local codes vary, but expect to need proper grounding, GFCI-protected outlets, and possibly a permit. Talk to a plumber and electrician early: it’s cheaper than retrofitting.
Material Selection and Durability
Outdoor kitchen countertops face sun, rain, and temperature swings. Granite and limestone are beautiful but require sealing every 1–2 years and can stain. Stainless steel withstands weather but shows fingerprints and reflects intense heat. Concrete offers affordability and custom shapes: seal it well to prevent cracking from freeze-thaw cycles in cold climates.
For the structure, stainless-steel framing or pressure-treated wood both work. Stainless lasts longer but costs more upfront. Pressure-treated lumber is budget-friendly and rot-resistant, though you’ll eventually replace boards as they gray and split. Cedar or composite materials split the difference but require annual maintenance.
Grills and cooktops should be stainless steel with sealed burners to handle moisture. Cast-iron grates will rust unless dried after use: enameled or stainless grates age better. Bar-top seating uses marine-grade materials or powder-coated aluminum that won’t corrode in wet conditions.
One practical tip: build your kitchen 3–4 inches higher than standard indoor counters (about 39 inches instead of 36). Outdoor cooking often involves standing and reaching across a grill, and the extra height saves your back.
Creative L-Shaped Outdoor Kitchen Ideas by Space Type
Layout depends on what you’re working with. Here’s how to size and equip an L-shaped kitchen for different backyards.
Small Backyard Solutions
In tight spaces (under 8 feet per leg), go minimal but functional. One leg holds a compact grill or portable cooktop with a small prep counter, think 24 to 30 inches wide. The other leg has a sink with under-counter storage and room for a cooler or beverage fridge. Skip the pizza oven or giant cooktop: you don’t have room, and it’ll feel cramped.
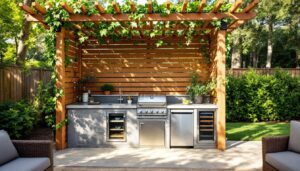
Use open shelving instead of closed cabinets to keep the sightline clear and the space from feeling boxed in. A stainless-steel cart on wheels slides under the overhang when not in use. Mount a simple pergola or shade cloth overhead to define the zone without building a full structure.
For materials, concrete poured in-place is cheaper and faster than stone, and it suits compact layouts. Remodelista offers detailed planning advice for outdoor kitchen setups in tight spaces, including creative grill placement and counter arrangements.
Large Entertaining Spaces
If you have room (10+ feet per leg), think in zones. One leg is the “hot zone”: a gas grill, smoker, or built-in cooktop with a landing space on each side for tools and plated food. The other leg is the “cold zone”: a full sink, ice maker, beverage fridge, and a long prep counter (4 to 6 feet) for chopping and mixing.
Add a counter-height bar seating along the outside edge of the L. This gives guests a place to sit and chat while you cook, and they’re not underfoot. Use a durable material for the seating area, sealed concrete, composite, or commercial-grade laminate, that can handle spills.
Incorporate storage thoughtfully. Outdoor cabinets with stainless-steel or powder-coated hardware resist rust. Drawer dividers, pull-outs, and labeled bins keep grilling tools, napkins, and condiments organized. A deep drawer under the grill side slides out for propane tanks or wood chips.
Consider adding a pizza oven, rotisserie, or smoker to the end of one leg if you have the space. These focal points justify a larger kitchen and make entertaining feel like an event. Overhead lighting on a pergola or soffit keeps the space functional after sunset.
Essential Appliances and Features
Start with the grill, it’s the heart of an outdoor kitchen. A 4-burner gas grill (about 48 inches wide) is a sensible middle ground. Smaller two-burner grills feel cramped for entertaining: large 6-burner units hog space and money. Propane tanks should store safely away from the cooking area, ideally in a weather-proof box on the far side of one leg.
A sink is more useful than most people think. You’ll wash hands, rinse vegetables, and clean tools constantly. A small stainless-steel prep sink (18–24 inches wide) is better than nothing. Run the supply line from your main water spigot or a dedicated outdoor line, and let the drain empty into a gravel pit or dry well (check local codes). Omit a hot water line to save cost and complexity: cold water works fine for rinsing.
Refrigeration keeps drinks and perishables safe. A compact outdoor fridge (3–5 cubic feet) fits under most counter overhangs and draws less power than a standard unit. Coolers with ice work in a pinch, but an actual fridge is convenient. Beer taps or wine fridges are nice-to-haves, not must-haves.
A cooktop or side burner lets you simmer sauces, boil pasta, or keep soup warm without firing up the main grill. A single 15,000-BTU side burner costs $150–$300 and bolts into a counter cutout. It’s less essential than a sink but justifies itself on cooler evenings when you want to cook indoors outside.
Bar seating, shade cloth, and task lighting elevate the space from functional to inviting. LED strip lights under the soffit or pendant lights on chains illuminate the counter without eating power. A ceiling fan or misting system helps on hot days. Homify and design-focused sites showcase how these finishing touches tie a kitchen together visually.
Storage carts, magnetic spice racks, and tool hooks keep everything accessible. The Kitchn covers kitchen organization strategies that apply outdoors just as well, group like items, label containers, and resist hoarding gadgets you won’t use. A weatherproof cover for the grill and a sealed trash bin complete the setup.
For a 10-by-8-foot L-shaped kitchen, budget $3,000–$8,000 if you’re building from stainless-steel components and concrete countertops, $8,000–$15,000 with stone and custom cabinetry, and $15,000+ for high-end grills, refrigeration, and gas cooktops. Labor costs depend heavily on whether you’re doing demolition and grading yourself or hiring contractors.
Don’t skip the permits. Building codes require electrical outlets to be GFCI-protected, gas lines to have approved regulators and shutoffs, and structural elements in flood-prone areas to meet elevation standards. Reach out to your local building department before breaking ground: a small inspection fee beats expensive corrections later.