Adding a Traeger to your outdoor kitchen transforms a cooking space into a real destination, but it’s not just about dropping a pellet smoker into the corner. A properly integrated Traeger becomes the centerpiece of an outdoor living area, with workflow, ventilation, and layout working in harmony. Whether you’re planning a modest patio upgrade or a full backyard renovation, understanding how to position, protect, and maintain a Traeger ensures it delivers years of reliable service. This guide walks you through the practical decisions: which model fits your footprint, how to arrange your workspace, and what installation and maintenance demands actually matter.
Table of Contents
ToggleKey Takeaways
- A Traeger outdoor kitchen transforms your cooking space into a year-round entertainment hub by delivering low-and-slow smoking capability while freeing up your main grill for high-heat cooking.
- Choose your Traeger model based on cooking surface area (440–780+ square inches) and available space, accounting for at least 12 inches of clearance on all sides and overhead ventilation requirements.
- Proper installation on a level surface with adequate electrical outlet access, plus strategic placement near prep and serving counters, creates an efficient workflow that maximizes both function and entertaining capacity.
- Routine maintenance—emptying grease trays, cleaning grates annually, inspecting the firepot quarterly, and protecting against moisture—prevents costly repairs and ensures reliable performance for years.
- A weatherproof cover and climate-appropriate storage during off-season protect your Traeger’s finish and electrical components, extending its lifespan in any weather condition.
Why Add a Traeger to Your Outdoor Kitchen Setup
A Traeger pellet smoker does something a standard grill doesn’t: it delivers low-and-slow smoking capability without the hands-on tending of traditional charcoal or wood offsets. For homeowners building or upgrading an outdoor kitchen, that’s a game-changer. You get consistent temperatures, repeatable results, and the ability to walk away while your brisket, ribs, or whole chicken cook unattended for 8–12 hours.
Trout and other pellet smokers also free up grill space. Rather than dedicating your main grill to 12-hour smoke sessions, you keep it ready for burgers and steaks while the Traeger handles the low-temperature work. For serious outdoor cooks, that redundancy is invaluable, especially when hosting. Guests get faster service at the hot grill while the show-stealer smokes in the background.
From a design perspective, a Traeger’s clean lines and compact footprint (most models fit in 2–3 feet of linear space) make it a natural addition to built-in cabinetry. Unlike bulky barrel smokers, modern Traegers tuck neatly into outdoor kitchens, keeping your space functional rather than yard-sale cluttered.
Choosing the Right Traeger Model for Your Space
Traeger’s 2026 lineup offers models from compact portable rigs to large stationary units. Size and cooking capacity are the first decision points.
For small patios or tight footprints, the Traeger Pro or similar 500-series models deliver roughly 440 square inches of cooking surface in a body roughly 36 inches long and 24 inches deep, think apartment patio feasible. Mid-range options like the Traeger Ironwood series push 600+ square inches of grates and include integrated WiFi controls for temperature monitoring from your phone. The largest units, like the Traeger Timberline, exceed 780 square inches and include a full hopper and secondary shelf for plating, luxury territory for serious entertaining.
Before shopping, measure your intended spot. Account for clearance on all sides (at least 12 inches from walls or structures) and overhead clearance if your outdoor kitchen has a hood or covered structure. Traeger publishes specific dimensions for each model: use them, don’t eyeball it.
Budget also drives the choice. Entry-level Traegers run $400–$600, mid-range units $800–$1,400, and premium models exceed $2,000. Pellet consumption averages 1–3 pounds per hour, depending on temperature, a consideration if you cook frequently. Buy a weatherproof cover ($80–$150) regardless of model: UV and rain degrade exterior finishes, and covers prevent critter nesting in the firebox during offseason.
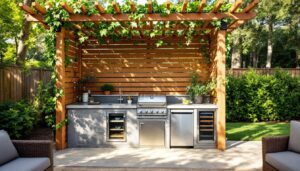
Design and Layout Considerations
Think of your Traeger placement like kitchen workflow indoors: prep on one side, the heat source in the middle, and plating or resting on the other. Ideally, your smoker sits 18–24 inches from a counter surface where you can set tools, sauces, and meat thermometers. A small side table or a built-in stainless steel shelf (bolted to a post or support frame) keeps essentials within arm’s reach while you manage the cook.
Ventilation matters more than many DIYers realize. Pellet smokers produce clean smoke but still generate heat and moisture. If your outdoor kitchen sits under a pergola or covered area, leave at least 12–18 inches clearance above the Traeger’s chimney. Enclosed structures or dense overhangs trap heat and encourage condensation on ceilings or adjacent walls, a real problem in humid climates. Open-air setups eliminate this: if you must place the Traeger under cover, ensure adequate overhead airflow or install a small duct to vent smoke upward and away.
Sunshine exposure is secondary but real. Direct sun can cause grill case discoloration and accelerate finish wear. Position your Traeger in a spot that catches afternoon shade if possible, or plan for a permanent awning or umbrella for protection. Southern and western exposures get hammered in summer.
Finally, consider finish consistency. If your outdoor kitchen uses built-in cabinetry, matching your Traeger’s appearance, whether black powder coat, stainless steel, or custom surrounding surfaces, ties the space together. Traeger offers various cabinet integrations: measure your countertop height and cabinetry depth before purchase.
Installation and Setup Tips
Installation is straightforward, but details determine longevity. Traeger units arrive partially assembled: unbox everything carefully and place the unit on a level, stable surface. Use a 2-foot level to check both length and width. Even slight slopes cause grease to pool and uneven heat distribution. If your patio slopes, shim under the feet with stainless steel shims or adjust legs if your model has them.
Electrical requirements are minimal, most Traegers need a standard 110V outlet within reasonable extension cord distance. If you’re running power to a permanent outdoor kitchen, consider running a dedicated 20-amp circuit to the location. Wet conditions and outdoor electronics demand proper GFCI protection: if you’re hiring an electrician, ask for a weatherproof outlet box with GFCI built in.
Pellet storage deserves thought. Keep pellets in a dry, ventilated container away from direct sun and moisture. A sealed plastic bin with a latch works fine, but commercial-grade stainless steel hoppers (often sold separately) last longer. Don’t stock more than a few bags: pellets absorb moisture and degrade over months.
Assembly typically takes 1–2 hours solo, though a second person makes final positioning and securing easier, especially for larger models. Follow the manual exactly: bolts, fasteners, and electrical connections vary by model. Resist the urge to customize at first, get the unit running as intended before experimenting.
Creating a Functional Workflow
Once installed, optimize the workspace around your Traeger. Designate a prep zone (counter space for seasoning, plating, and holding food before it goes on the grate), a cooking zone (the Traeger and immediate surround), and a resting zone (a secondary counter where finished meat sits under foil before serving).
Standard counter depth is 24 inches: ensure your Traeger placement doesn’t crowd adjacent surfaces. If you’re building cabinetry around it, a typical outdoor kitchen layout puts the Traeger on one side of a peninsula or island, with prep space across from it and a serving counter to one end. This arrangement keeps traffic flow clear and prevents cross-contamination (raw prep area separate from cooking zone).
Tools and supplies, instant-read thermometer, tongs, gloves, drip liner replacements, should have a home within 3 feet of the Traeger. A pegboard on an adjacent post or a small wall-mounted rack keeps gear visible and accessible. That small detail transforms chaos into function when you’re managing four dishes at once.
Maintenance and Year-Round Care
A Traeger doesn’t demand constant fussing, but routine maintenance prevents expensive repairs. After every few cooks, empty the grease drip tray (usually a slide-out pan at the base) and dispose of grease safely, never down a drain. Use a grill brush or scraper on the grates annually to remove buildup and rust. For stubborn deposits, remove grates and soak them in warm, soapy water for an hour before scrubbing.
The firepot, the metal cup in the center of the cooking chamber that ignites pellets, collects ash. Most Traegers include a firepot cleaning tool: run it around the edges quarterly to prevent ash blockage and poor ignition. If your Traeger gets used frequently (multiple times weekly), check the firepot monthly.
Pellet auger and hopper inspection happens annually. Remove a few pellets and inspect for mold or discoloration. If pellets are damp or discolored, they’re likely absorbing moisture: replace them and check your storage setup. A damp pellet supply is the fastest way to clog an auger or trigger “no ignition” errors.
Seasonal protection varies by climate. In mild climates, a quality cover suffices year-round. In cold, wet regions, consider moving the Traeger into a shed or garage during winter, or installing a permanent weatherproof enclosure. The igniter and electrical components handle cold fine, but prolonged moisture exposure accelerates rust. High-humidity coastal environments demand special attention, consider stainless steel components if you live near salt water.
Winter storage or hibernation is simple: drain remaining pellets, run the Traeger at high heat for 15 minutes to clear the auger, shut it down, and cover. Before spring use, run a quick ignition test in high-heat mode to confirm everything lights cleanly. If ignition fails, the hot rod element may need replacement, a $50–$150 part that DIYers can swap with basic tools and the manual.
Traeger’s customer support is solid: spare parts are inexpensive and widely available. Don’t let a small failure turn into neglect. Small repairs now beat a broken Traeger at midsummer entertaining.
Conclusion
Integrating a Traeger into your outdoor kitchen is a practical upgrade that yields years of reliable smoking and entertaining. The real payoff comes from thoughtful placement, proper sizing to your space, and honest-to-goodness maintenance. Skip the fancy add-ons at first, get the fundamentals right: solid installation, smart workflow, and seasonal protection. A well-planned outdoor kitchen with a properly maintained Traeger becomes the real hub of summer hospitality.