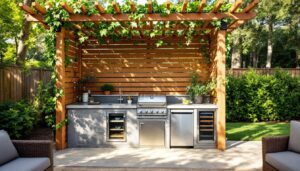
Building an outdoor kitchen doesn’t require a contractor’s budget or years of carpentry experience. With solid wood frame plans and a methodical approach, homeowners can create a functional, attractive cooking space that transforms a backyard. The key is understanding the core structure, a sturdy wood frame serves as the backbone for everything else. This guide walks through planning, material selection, framing, and finishing an outdoor kitchen that’ll handle grilling season after season. Whether you’re starting with a simple grill station or a full prep-and-cooking setup, the fundamentals remain the same: proper foundation, weather-resistant materials, and honest assessment of your skill level.
Table of Contents
ToggleKey Takeaways
- A solid wood frame serves as the backbone of any outdoor kitchen, making proper material selection and construction essential for durability across grilling seasons.
- Plan your wood frame layout carefully by measuring your space, sketching the design, checking local building codes, and accounting for utilities like gas, water, and electrical before construction begins.
- Choose pressure-treated lumber rated for ground contact or decay-resistant woods like cedar and redwood for your outdoor kitchen frame, and allow materials to acclimate outdoors for 2–3 weeks before building.
- Create a level, stable foundation using concrete pads or pier blocks set below the frost line, and verify all posts are perfectly plumb before bolting the top frame and bracing for wind resistance.
- Seal and stain exposed wood every 2–3 years with exterior-grade products, inspect annually for rot or damage, and plan to replace wood frame sections every 5–15 years depending on material type.
- Integrate appliances like drop-in grills with proper support, and hire licensed professionals for all gas connections and water lines to ensure safety and code compliance.
Planning Your Outdoor Kitchen Layout and Design
Start by measuring your space and deciding what you actually need. A grill, countertop, storage, sink, each element changes the footprint and complexity. Sketch the layout on paper, noting traffic flow and proximity to your home (utility access matters if you’re running gas or water lines). Most outdoor kitchens range from 4 feet to 12 feet long: compact designs work for renters or small yards, while larger installations suit established homes with entertaining space.
Check local building codes before committing to design. Some jurisdictions require permits for built-in appliances, gas connections, or structures over a certain size. If your setup sits permanently in one spot and includes fixed cabinetry or appliances, a permit conversation is likely unavoidable, and that’s fine. It protects your property value and ensures the work meets code. Think about weather exposure, too. Will the kitchen face direct sun, wind, or rain? That drives material selection and roofing decisions later.
Sketch electrical and utility needs on your plan. Running a circuit to power lights or a refrigerator involves hiring a licensed electrician in most areas: gas lines definitely do. Water drainage from a sink needs planning to avoid pooling or damaging nearby structures. Simple grill stations skip most utilities, but anything approaching a full kitchen should account for these upfront.
Essential Materials and Tools You’ll Need
Wood Selection and Preparation
Choose pressure-treated lumber or decay-resistant species like cedar or redwood for all framing. Avoid untreated pine: it rots within a season or two outdoors. Pressure-treated wood rated for ground contact (marked with a label) works for posts and the base frame. For the visible frame and shelving, many builders prefer cedar, it looks better and resists rot without chemical treatment, though it’s pricier.
Calculate lumber needs based on your sketch. A typical 6-foot grill station uses 4×4 posts for corners, 2×6 joists for the top frame, and 2×4 studs for walls. Order 10–15% extra to account for waste and mistakes. Let pressure-treated lumber acclimate outdoors for 2–3 weeks before building: it shrinks as it dries, and dry wood joints are more stable.
Material checklist:
- Pressure-treated 4×4 posts (corners and support)
- Pressure-treated or cedar 2×6 lumber (joists, frame)
- Pressure-treated or cedar 2×4 lumber (studs, bracing)
- Exterior-grade plywood or cedar boards (countertop base, walls)
- Galvanized or stainless steel bolts, lag screws, and carriage bolts (¼ inch or larger)
- Exterior wood screws (3 and 2.5 inch: no nails, they work loose outdoors)
- Concrete, gravel, or pavers for foundation
- Deck stain or sealant rated for exterior use
- Your choice of countertop: granite, tile, stainless steel, or concrete
Tool list:
- Drill-driver with bits
- Circular saw or miter saw (miter saw gives cleaner 45° angle cuts)
- Level (at least 4 feet long)
- Tape measure (25 feet minimum)
- Square (combination square for layout)
- Grinder for smoothing rough edges
- Orbital sander or hand sanding block
- Paintbrush and roller for sealant
- Gravel shovel, wheelbarrow for foundation prep
Safety gear is non-negotiable: safety glasses, work gloves, dust mask, and ear protection when cutting.
Building the Wood Frame Foundation
Creating a Level Base and Support Structure
The foundation determines how long your kitchen lasts. A poorly leveled base causes doors to hang wrong, counters to sag, and water to pool. Clear and compact the ground where your kitchen will sit. Remove grass and roots: the base should be firm soil or prepared gravel. For permanent installations, lay a 4-inch layer of compacted gravel or pea stone: this aids drainage and prevents standing water.
Set your corner posts on concrete pads or pier blocks sunk below the frost line, check your local frost depth with your building department. For a 6-foot kitchen in most climates, 12-inch-deep holes work: in harsh winters, dig deeper. Pour a concrete pad or set a pre-made pier block in each hole, then place your 4×4 posts on top. Use a 4-foot level to check that all posts are plumb (perfectly vertical) and at the same height. Shim with treated shims if needed: never skip this step.
Once posts are set and verified level, bolt them to the pads using lag screws or carriage bolts through pilot holes (predrill to avoid splitting). Space bolts 24 inches apart. Now build the top frame by attaching 2×6 beams between posts using half-lap joints or heavy-duty bolted connections, exterior-grade bolts only, galvanized or stainless steel. The frame becomes the support for your countertop.
Brace the structure with diagonal 2×4 cross-braces from posts to frame if spanning more than 4 feet without intermediate support. This prevents racking (leaning side-to-side). Bolt or screw braces securely: don’t rely on nailing. Every connection should be removable, repairable, and strong enough to handle wind and the weight of appliances and people leaning on counters.
Installing Countertops, Appliances, and Finishing Details
Once the frame is solid and level, build the countertop base. Sheath the top frame with exterior plywood (½ inch CDX or better), then add a support ledger underneath if you’re tiling or using stone. Many builders lay a waterproof membrane, rolled tar paper or Kerdi membrane, over the plywood, especially if water will pool (like around a sink).
Your countertop choice affects durability and aesthetics. Tile over a cement backer board lasts decades if installed with proper slope for drainage. Stainless steel works great around grills but conducts heat. Granite or concrete are heavy, verify your frame can support the weight (typically 10–15 pounds per square foot). Avoid standard laminate: it delaminates outdoors and rots underneath within seasons.
Integrate your grill and appliances next. If you’re using a drop-in grill, mark the cutout on your countertop base, cut it with a jigsaw, and frame the opening with a steel angle or treated-wood ledger to support the grill’s rim. Secure the grill with bolts or provided brackets: don’t let it sit loose. Gas connections must be made by a licensed professional, no exceptions. Same for water lines to a sink.
Finish exposed wood with a quality exterior-grade sealant or deck stain, applied per manufacturer guidance. Sand first with 120–150 grit paper for better adhesion. Most sealers need two coats and recoating every 2–3 years. Consider adding storage doors or drawers to the structure using exterior-rated plywood and stainless hardware: these protect supplies and tools from weather.
Add a roof or overhead structure if budget allows. A simple pergola with polycarbonate panels diffuses sun and sheds light rain without trapping heat. A full roof requires proper framing and slope: consult resources like Ana White’s nesting grill station plans or detailed step-by-step guides for inspiration and structural ideas. For complex roofing, a carpenter’s eye saves mistakes.
Maintenance and Weather Protection Tips
An outdoor kitchen sees year-round exposure, so maintenance keeps it usable and looking good. Inspect the frame every spring for soft wood, rot, or insect damage, press a screwdriver into suspect areas: soft wood means trouble. Pressure-treated lumber lasts 10–15 years: cedar or redwood, 5–10 years. Plan to replace damaged sections or the entire frame eventually.
Seal and stain wood every 2–3 years, more often in harsh climates. A quality exterior sealant protects against UV damage and water penetration, preventing splits and rot. Before resealing, sand lightly and clean off mildew or mold with a soft brush, pressure washing works but can damage soft wood.
Covers aren’t mandatory, but a fitted tarp during winter or off-season protects countertops and appliances. Make sure water drains freely from under the cover: trapped moisture accelerates decay. Stainless steel hardware should be rinsed occasionally to prevent salt-air corrosion if you’re near the coast.
For deeper dives into long-term structural maintenance, Fix This Build That offers detailed workshop and building care guides. Address small issues early, a cracked post or loose bolt is a 20-minute fix: a collapsed frame is a rebuild.