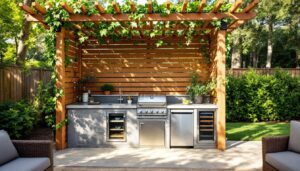
A stacked stone outdoor kitchen transforms a patio from afterthought into a destination. The natural texture and durability of stone create an outdoor cooking space that weathers years of use while looking better each season. Whether you’re planning a full built-in kitchen or a simple grill surround, understanding how to work with stacked stone separates a weekend project from one that cracks or crumbles by next spring. This guide walks you through material selection, layout planning, and the actual installation process, covering what pros know and what DIYers most often get wrong.
Table of Contents
ToggleKey Takeaways
- Stacked stone outdoor kitchens offer unmatched durability and longevity—properly mortared stone will outlast most homeowners and rarely looks dated, unlike wood, composite, or metal alternatives.
- A solid foundation is critical for success: prepare a compacted gravel base with a concrete footing below the frost line, then pour a 4-inch leveling pad before any stone work begins—skipping this step is why most DIY walls lean or crack.
- Ashlar and ledge stone are beginner-friendly choices because they stack predictably, while rubble stone requires more fitting patience; regardless of type, dry-lay your first course as a mock-up to prevent layout problems mid-project.
- Mortaring requires consistent 3/8 to 1/2 inch joints using Type S exterior mortar, and tooling joints 4-6 hours later is essential for water shedding and long-term durability.
- Annual maintenance—inspecting mortar joints for cracks wider than 1/8 inch and repointing as needed—prevents expensive repairs and keeps your stacked stone kitchen functional for decades.
Why Stacked Stone Is the Perfect Material for Outdoor Kitchens
Stacked stone handles outdoor cooking demands better than most alternatives. It resists heat from grills, weathering from UV and moisture cycles, and the constant cleaning that outdoor kitchens endure. Unlike wood or composite materials, stone doesn’t rot, warp, or require staining every two years.
There’s also something psychologically satisfying about a kitchen built from stone, it signals permanence and craft. Stacked stone is available in shapes and colors matched to your region: flagstone, ashlar (rectangular cut pieces), rubble (irregular shapes), or ledge stone. Ashlar and ledge stone are easiest for beginners because they stack predictably and mortars cleanly. Rubble stone looks dramatic but demands more patience fitting pieces together.
The real advantage? Longevity. A properly mortared stacked stone kitchen built today will likely outlast the homeowner. Compared to poured concrete surrounds or metal cladding, stone rarely looks dated and repairs are straightforward, you can repoint mortar or replace individual stones decades down the road.
Essential Materials and Tools You’ll Need
Materials List
- Stacked stone veneer or full-depth stone (8-12 inches thick for load-bearing walls). Order 10% extra for cuts and breakage.
- Mortar mix rated for exterior use (Type N or Type S: Type S is stronger for heavy-duty applications). Pre-bagged exterior mortar works fine.
- Concrete foundation or compacted gravel base rated to support the structure’s weight.
- Rebar and wire mesh if your wall exceeds 3 feet in height (building codes vary: check locally).
- Flashing at the top if your stone meets roof lines or siding.
- Concrete primer and paintable caulk for sealing joints between stone and other materials.
Tools and Safety Gear
- Masonry tools: Trowel (4-6 inch), pointing trowel, level (2-4 feet), chalk line, grinder with stone blade.
- Cutting and fitting: Masonry saw or angle grinder for trimming: a cold chisel works for smaller adjustments but is slower.
- Miscellaneous: Bucket, sponge, stiff brush, tape measure, square, safety glasses, dust mask, work gloves, and ear protection when using power tools.
This is not a beginner-friendly list of tools. If you don’t own a grinder and masonry saw, budget for rental or hand tools that take longer. Don’t skimp on eye protection, stone shards move fast.
Planning Your Outdoor Kitchen Layout and Design
Start with a simple site plan on graph paper. Mark where your grill sits, prep table, sink, and any appliances will go. Stacked stone works best for walls, piers, and structural surrounds, think of it as the skeleton, not the countertop.
Measure the actual dimensions of your grill opening and leave at least 12 inches of clearance on either side if the stone will surround it (heat expands and mortar is still live as it cures). Decide on wall height: a typical outdoor kitchen counter stands 36 inches tall (same as indoor countertops). If you’re adding a backsplash or decorative upper section, that adds another 12-24 inches.
Solve the foundation problem before you buy stone. A stacked stone wall is heavy, expect roughly 120-150 pounds per square foot for full-depth stone. If building on soil, you’ll need a compacted gravel base, ideally with a concrete footer below frost line (frost depth varies by region: check local building codes). If building on an existing patio, pour a 4-inch concrete pad and let it cure 7 days before mortaring stone. This step is what most DIYers skip, and it’s why their walls lean or crack within a season.
Step-by-Step Installation Process for Stacked Stone
Preparing the Foundation
Before touching a single stone, your base must be solid. If you’re building on soil, compact the earth in layers using a hand tamper or plate compactor, each 4-inch layer of soil gets compacted, then a 4-6 inch gravel layer goes down on top, compacted again. This prevents settling.
Pour a concrete footing below your region’s frost line (12-48 inches depending on climate: your building department has this number). Let it cure fully. Then, pour a 4-inch concrete leveling pad on top where your stone will start. Use a straight edge to make the pad level, this single step saves hours of headache mortaring crooked stones.
While concrete cures, dry-lay your first course of stone on the ground nearby to plan the pattern. This is called a “mock-up” and it prevents you from realizing mid-wall that your best stones don’t fit together. Arrange larger stones to create a running bond, no vertical joints stacking directly on top of each other. This interlocking pattern is what hardscaping dry stone walls demonstrates: the careful placement of stones without mortar creates strength, and mortared work follows the same principle.
Laying and Mortaring the Stone
Mix mortar to a thick peanut butter consistency. Use Type S mortar for outdoor work (stronger than Type N): follow the bag’s ratio for water. Spread a 3/4-inch bed of mortar on your concrete pad using the flat side of the trowel. Set your first stone with a slight twist, this helps mortar flow underneath and prevents hollow voids.
Check level and plumb frequently. A stone that’s slightly off at the start creates a domino effect up the wall. Once your first course is set (wait 24 hours before loading stress on it), apply mortar to the vertical joint between stones, and then to the horizontal bed where the next stone sits. Keep mortar joints consistent, typically 3/8 to 1/2 inch. Thicker joints look sloppy: thinner ones don’t provide enough structural bonding.
Every 3-4 courses, push a length of rebar into the mortar joints for lateral reinforcement if your wall is taller than 3 feet (building codes require this). Fill cavities behind the stone with mortar or concrete to eliminate voids, hollow spots are where water infiltrates and frost heave occurs.
As you work upward, use a grinder to cut stones that don’t fit. Cut from the back whenever possible (dust stays behind the wall, not in your face). After mortar firms up but before it fully hardens (roughly 4-6 hours), tool the joints with a pointing trowel to compress mortar and create a finished look. This step is not optional, untooled joints shed water and deteriorate faster.
Resources like Instructables offer step-by-step visual tutorials for mortaring techniques that can reinforce what you’re learning hands-on. Once your wall reaches full height, wait 7 days before sealing or applying any finish.
Maintenance and Long-Term Care Tips
The day after your mortar hardens fully, brush the wall lightly with a stiff brush to remove dust and loose bits. Don’t pressure wash until the mortar has truly cured, at least 2-3 weeks. High pressure can blow mortar out of joints before it’s fully strong.
Once a year, inspect the mortar joints. Look for cracks wider than 1/8 inch, crumbling mortar, or gaps where water could pool. These are entry points for moisture and frost damage. Repoint cracked sections using a grinder to cut out old mortar, then pack fresh mortar into the joint with a pointing trowel. This is a maintenance task, not an emergency, but staying on top of it prevents expensive full-wall rebuilds.
Seal the stone itself every 2-3 years if you want to reduce moss or lichen growth. Use a penetrating sealer designed for masonry (read the label, some are decorative and darken stone). A sealer won’t prevent frost damage, but it can slow water infiltration.
Stone cookery surfaces benefit from minimal intervention. Don’t use wire brushes directly on the face, they score and discolor the stone. A stiff natural bristle brush and mild detergent (even diluted dish soap) clean without damage. For stubborn stains, fine homebuilding and similar resources discuss specialized masonry cleaners, but test any product on a hidden area first.
If your outdoor kitchen takes on a lean or you see large cracks radiating from joints, that’s a sign of a bad foundation or settlement. This requires assessment by someone experienced in masonry. Don’t ignore it, water will follow the path of least resistance and accelerate damage.