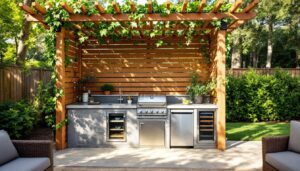
An outdoor kitchen transforms your backyard into an entertainment hub, but the difference between a wobbly DIY disaster and a solid, long-lasting structure starts with proper framing. Whether you’re planning a simple grilling station or a full-featured cooking center, understanding outdoor kitchen framing fundamentals is essential. The frame is the skeleton supporting everything, countertops, appliances, storage, so getting it right means your kitchen will stand firm through seasons of weather and use. This guide walks you through the planning, materials, and step-by-step process to build a frame that’ll handle whatever you throw at it.
Table of Contents
ToggleKey Takeaways
- Outdoor kitchen framing must be engineered to support heavy appliances (300+ pounds) and withstand constant exposure to moisture, temperature fluctuations, and UV rays.
- A properly level and square outdoor kitchen framing foundation prevents cascading problems with countertops, doors, and siding installation.
- Use only stainless steel or hot-dipped galvanized fasteners and pressure-treated lumber rated for ground contact to avoid rust, rot, and premature failure.
- Post holes must extend 36–48 inches below grade (verify local frost line), and joists should be installed 16 inches on center with reinforcement beneath heavy appliances.
- Weatherproofing with flashing, house wrap, and exterior-rated caulk is critical to prevent water damage and rot—the leading cause of outdoor kitchen structural failure.
- Always obtain local building permits before construction, as they specify foundation depth, load requirements, setback distances, and electrical codes required for your region.
Understanding Outdoor Kitchen Framing Basics
Outdoor kitchen framing differs from indoor construction because it must withstand constant exposure to moisture, temperature swings, and UV rays. Unlike a garden shed, outdoor kitchens bear the weight of heavy appliances, built-in grills can weigh 300+ pounds, so structural integrity isn’t optional.
Why Proper Framing Matters
A well-designed frame distributes loads evenly across a solid foundation, preventing sagging, cracking, and premature material failure. Shortcuts like undersized lumber or improper fastening lead to problems within a season or two. Think of framing as the contract between you and the elements: get it right, and your kitchen lasts decades: cut corners, and you’re rebuilding in five years.
Most outdoor kitchens use one of two framing approaches. Masonry-based frames use concrete blocks or stone as both the structure and the exterior, offering durability and a finished appearance. Wood-frame construction uses pressure-treated lumber or composite materials wrapped with weather-resistant cladding. Wood frames are lighter, easier to modify, and work well for mixed-material designs. Masonry is heavier, requires careful foundation work, and typically suits stationary designs. The choice depends on your space, budget, and aesthetic goals.
Proper framing also simplifies finish work. A square, level frame means countertops sit flush, doors close smoothly, and siding installs without gaps. Sloppy framing creates a cascade of problems downstream.
Essential Materials and Tools You’ll Need
Before you buy a single board, inventory what you’ll need. Most outdoor kitchen frames rely on pressure-treated lumber rated for ground contact, such as PT 2×4s and 2×6s. PT lumber has been chemically treated to resist rot and insects: newer formulations (copper-based) are safer than old arsenic-based treatments but still require gloves during handling.
For fasteners, use stainless steel or hot-dipped galvanized bolts, screws, and nails, never plain steel, which rusts and stains. Masonry anchors, L-brackets, and post bases add structural redundancy and reduce settling over time.
Materials checklist:
- Pressure-treated lumber (2×4s, 2×6s, 4×4 posts)
- Stainless steel or galvanized fasteners (bolts, lag screws, hurricane ties)
- Post-base hardware and joist hangers
- Concrete (60-lb bags) and gravel for the foundation
- Flashing and house wrap to divert water
- Caulk rated for exterior wood-to-masonry joints
Tools you’ll need:
- Circular saw or miter saw for crosscutting
- Power drill with bits and driver tips
- Level (2–4 feet) and tape measure
- Post-hole digger or power auger
- Socket set for bolts
- Safety gear: work gloves, safety goggles, dust mask, ear protection
Rent specialty tools like a power auger if you’re digging deep post holes: it saves your back and time. A helper is essential for holding boards square while fastening.
Planning Your Layout and Building Permits
Before cutting lumber, sketch your layout to scale and verify local building codes. Most jurisdictions require permits for permanent outdoor structures, especially those over a certain height or footprint. Your local building department specifies foundation depth (typically 36–48 inches below grade in cold climates to avoid frost heave), load ratings, and materials.
Layout considerations:
- Appliance dimensions and clearances (most grills need 6–12 inches on sides and back for air flow)
- Work surface heights, typically 34–36 inches, matching indoor kitchen standards
- Traffic patterns and proximity to utilities (gas lines, electrical, water)
- Slope for drainage, a slight grade away from the structure prevents pooling
Measure your site and note obstacles: trees, property lines, existing hardscape. Account for weather exposure: a kitchen facing prevailing wind or constant afternoon sun will age faster and require more maintenance.
Permit essentials:
- Many municipalities classify outdoor kitchens as “accessory structures” requiring setback distances from property lines.
- If you’re adding plumbing or gas, those tie into separate permits and inspections.
- Permanent structures on a foundation often require engineered plans: temporary structures on decks may not.
Contact your local building department early: the conversation takes an hour but prevents costly rework. They’ll specify frost depth, snow load, wind requirements, and electrical codes. Skipping permits isn’t just risky, it can trigger fines, delays in selling your home, and denied insurance claims if something fails.
Step-by-Step Framing Process
Foundation and Posts
Start with a solid foundation. Dig postholes at least 36–48 inches deep (verify your local frost line) and 12 inches in diameter. Set 4×4 posts in concrete, ensuring they’re plumb (perfectly vertical) using a level. Concrete should cure for at least 48 hours before loading. Posts are typically spaced 4–6 feet apart, depending on the joist span: closer spacing increases strength.
Building the Base and Beams
Once posts are set, bolt pressure-treated beams (usually doubled 2×8s or 2×10s) horizontally across the posts, about 12–18 inches below your desired work surface. Use carriage bolts with washers and lock nuts, not just screws: bolts resist shear forces as the structure settles and shifts.
Confirm the beam is level from end to end. A tape measure diagonal check, measure corner-to-corner both ways: equal measurements mean the frame is square. Minor tweaks now prevent problems when countertops arrive.
Joists and Rim Boards
Install joists (typically 2×6 or 2×8 pressure-treated lumber) perpendicular to the beams, 16 inches on center. This spacing balances strength and material cost: wider spacing requires thicker lumber. Use joist hangers rather than toe-nailing: hangers distribute load more evenly and resist the twisting that occurs as wood shrinks.
Add rim boards around the perimeter to create a closed frame box. Stagger fasteners in a pattern to minimize splitting, and avoid driving nails or screws directly into endgrain, the wood holds fasteners poorly there.
Reinforcement and Blocking
Install blocking (short 2×4 pieces) between joists at midspan to reduce deflection (sagging) under heavy loads. Where you’ll mount a built-in grill or cooktop, double the joists or add reinforcement below: a 300-pound appliance concentrated on a single joist is a recipe for flex and cracks in finished materials.
Structural ties (hurricane ties or angle brackets) connect beams to posts, resisting wind uplift. Don’t skip these, they’re cheap insurance against your kitchen migrating during a storm.
Final Frame Check
Before moving forward, confirm your frame is plumb, level, and square. Measure diagonals, check the level in multiple directions, and look for any twist or rock. If something’s off, fix it now: adjusting a beam is hours of work: tearing out countertops and cladding because the frame settled unevenly is weeks.
Weatherproofing and Finishing Your Frame
Once the frame is structurally sound, weatherproofing keeps water out, the leading cause of rot and structural failure in outdoor kitchens.
Water management steps:
- Wrap the frame’s top with galvanized or stainless flashing before installing countertops or cladding. Flashing channels water down and away, not into wood.
- Install house wrap or felt underlayment on exterior walls before attaching siding or stucco. This acts as a secondary water barrier while letting trapped moisture escape.
- Caulk all joints between wood and masonry, metal and wood, and any fastener penetrations. Use elastomeric caulk rated for exterior conditions: standard paintable caulk fails within a year.
- Ensure deck boards, countertops, or structural decking slope slightly (1/8 inch per foot) to drain water away from seams and toward edges.
Cladding options:
- Composite materials (like deck boards) resist rot and require minimal maintenance but cost more upfront.
- Pressure-treated lumber needs regular sealing or staining every 2–3 years, budget for that maintenance.
- Masonry veneer (stone, brick, or stucco over the frame) offers durability and aesthetics but adds weight and complexity.
For outdoor grilling stations, concrete block bases combined with wooden upper frames are a proven hybrid. The block handles ground moisture and the appliance’s weight, while the wood frame above offers lighter construction and easier countertop mounting.
Allow all materials to acclimate to your climate for a few days before assembly. Lumber especially shrinks or swells depending on humidity: installing framing and then cladding months later can create gaps as wood adjusts to outdoor conditions.
Conclusion
A solid outdoor kitchen frame sets the stage for years of cooking, entertaining, and enjoying your yard. Proper planning, quality materials, robust fastening, and thoughtful weatherproofing aren’t glamorous, but they’re the difference between a project that ages gracefully and one that crumbles in a few seasons. Take your time with the frame, double-check measurements and level at every step, and don’t hesitate to pull permits or call in professional help if you’re unsure about load calculations or local codes. Your future self, and your guests, will thank you when your kitchen is still standing strong a decade from now.