An outdoor kitchen transforms backyard entertaining and adds serious value to your home. Whether you’re grilling burgers for the neighborhood or hosting a summer dinner party, a well-built outdoor kitchen becomes the centerpiece of outdoor living. The good news: you don’t need a contractor’s budget to make it happen. This guide walks you through planning, building, and finishing a functional DIY outdoor kitchen that’ll handle real cooking and last through seasons of use. We’ll cover layout decisions, essential gear, structural basics, utilities, and maintenance so you can avoid costly mistakes.
Table of Contents
ToggleKey Takeaways
- Plan your homemade DIY outdoor kitchen layout by assessing sun exposure, wind direction, and space (ideally 8×10 feet minimum), then check local building codes before starting construction.
- Budget $2,000–$5,000 for a basic DIY outdoor kitchen with a grill and counter, or $8,000–$15,000+ if adding a sink, fridge, and quality cabinetry—prioritize appliances based on how you actually cook.
- Build on a level, properly drained concrete pad at least 4 inches thick, set below your local frost line, using pressure-treated lumber framing and exterior-grade materials to prevent rot and structural failure.
- Choose durable countertop materials like granite, concrete, or stainless steel, slope surfaces to prevent water pooling, and use outdoor-rated hardware with marine-grade hinges and handles.
- Hire licensed professionals for gas lines, electrical work, and complex plumbing—DIY mistakes with utilities pose serious fire, safety, and code-compliance risks.
- Maintain your outdoor kitchen annually by inspecting seals, power-washing seasonally, checking gas fittings for leaks, and protecting equipment during heavy winter weather to extend its lifespan.
Planning Your Outdoor Kitchen Layout
Assessing Your Space and Budget
Before you drive a single nail, walk your yard and look at sun exposure, wind direction, and traffic patterns. A kitchen facing west will bake in afternoon heat: one exposed to prevailing winds will blow smoke toward your neighbors (not ideal). Measure the area where you want to build, most functional outdoor kitchens need at least 8 by 10 feet, though 10 by 15 feet gives you breathing room for two people to cook comfortably.
Consider budget realistically. A basic DIY outdoor kitchen with a grill, counter space, and storage might cost $2,000–$5,000 in materials, depending on your choices and whether you already own tools. Add a sink with plumbing, a refrigerator, and quality cabinetry, and you’re looking at $8,000–$15,000 or more. Decide what you actually use: if you mostly grill, skip the built-in oven. If you rarely cook with gas, a charcoal grill might serve you fine.
Check local zoning regulations and building codes. Some jurisdictions require setbacks from property lines, permits for permanent structures, or gas line inspections. Call your local building department or check their website before finalizing your design, this step saves regret later.
Essential Appliances and Cooking Equipment
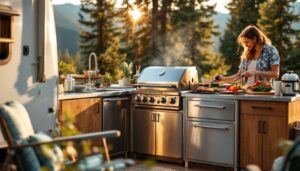
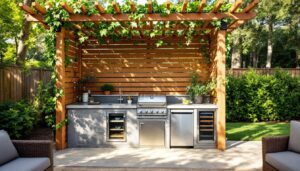
The grill is your anchor appliance. A stainless steel gas grill (three to four burners) is the reliable workhorse, offering even heat and easy temperature control. Built-in models sit flush in cabinetry: freestanding grills are simpler to install but take up more visual space. If you prefer charcoal, a ceramic kamado-style cooker or barrel grill gives you flexibility for grilling, smoking, and baking, though it demands more hands-on temperature management.
A grill-top griddle or side burner adds versatility, you can char vegetables, cook pancakes, or heat sauce without tying up the main grill. Most attach magnetically or hook over the grill grate.
Consider whether you need a sink. A three-compartment sink or beverage cooler requires water supply and drainage lines, adding complexity and cost. If budgets are tight, start without one: add it later when plumbing gets easier.
A mini fridge or beverage cooler is practical if you’re entertaining. Build-in models fit between counter sections: standalone units slide under counter overhangs. Check dimensions carefully, nominal space doesn’t always match appliance reality.
Storage cabinets should use marine-grade or powder-coated stainless steel hinges and handles: regular hardware rusts fast outdoors. Similarly, use exterior-rated wood or composite cabinet material, pressure-treated lumber or marine plywood for boxes, then finish accordingly.
Building Your Foundation and Base Structure
Start with a level, stable base. If you’re building on soil or sand, pour a concrete pad at least 4 inches thick with proper drainage slope (1/8-inch drop per foot away from structures). Frost heave, the upward expansion of frozen ground, can crack concrete and shift cabinets, so dig below your local frost line (typically 2–4 feet, but check with your local extension office or building department).
If you’re using a deck, ensure joists are rated for the load. An outdoor kitchen cabinet filled with stone countertop, grill, and gear can weigh 500+ pounds per linear foot, well beyond typical deck design loads. You may need to reinforce or add additional support posts.
Build cabinet frames from 2×4 pressure-treated lumber with a 16-inch on-center stud spacing. The frame doesn’t need to be fancy, but it must be square and level, use a 4-foot level and check diagonals by measuring corner-to-corner (opposite corners should measure the same if the frame is square). Secure the frame to the concrete pad with galvanized lag bolts set into concrete anchors.
Sheath the frame with exterior-grade plywood or composite decking, then apply a waterproof sealant or exterior paint. Don’t skip waterproofing: standing water inside cabinet frames leads to rot and structural failure fast. Brace and reinforce any openings for appliances, a grill opening creates a structural weak point that needs extra framing around it.
Installing Countertops, Storage, and Finishing Touches
Countertops see sun, weather, and heat. Granite, concrete, or stainless steel are the workhorses. Granite is beautiful and durable but pricey and requires sealing annually. Concrete can be stained, stamped, or left raw, it’s affordable and DIY-friendly if you’re comfortable with concrete finishing (woodworking project plans for step-by-step building frameworks). Stainless steel is modern and low-maintenance but dents easily and shows fingerprints.
Measure and cut carefully. A typical countertop overhang is 1 to 2 inches on the front, which provides leg room when standing. Slope the surface slightly away from walls and appliances so water doesn’t pool. Use outdoor-rated silicone caulk (not regular caulk) wherever countertop meets wall or appliance.
For doors and drawers, use stainless steel hardware with nylon bushings or self-closing hinges to handle outdoor humidity and prevent sagging. Install shelves or cubbies inside for storing charcoal, tools, and utensils. Wire shelving corrodes: use stainless steel or powder-coated steel instead.
Finish the sides with fiber-cement board, composite decking, or powder-coated metal trim. These materials don’t rot or require endless repainting. Power-wash periodically to prevent algae and mold, but don’t use harsh chemicals that damage sealant.
Utilities, Safety, and Maintenance
Gas supply requires a licensed professional in most areas. Propane lines can run above ground in flexible stainless tubing, while natural gas must be buried below frost line in rigid conduit. Never DIY this work, improper installation is a fire and explosion hazard. Check your local code: some jurisdictions require licensed plumbers or gas fitters to size and install lines.
For water and drainage, a simple cold-water line and P-trap drain are manageable DIY jobs if you’re comfortable with PEX or copper tubing and basic plumbing. Run lines below frost line or use insulated, above-ground lines with heat tape in cold climates. Drill a sloped drain hole in your concrete pad beforehand.
Electrical needs: outdoor outlets must be GFCI-protected and rated for wet locations (check the outlet face for “GFCI” or “WR”). Run wiring in rigid or flexible conduit, not loose in the air. Hire a licensed electrician to tie into your main panel, this is not a DIY task.
Wear safety glasses and work gloves when building. Use a dust mask when cutting or finishing wood. If handling concrete, wear gloves, wet concrete is caustic. Propane and natural gas work demands serious respect: never test for leaks with a match. Use soapy water and look for bubbles, or hire a pro.
Maintenance is simple if you build right. Inspect seals and hinges yearly. Power-wash the entire kitchen once or twice a season. Check propane regulators and fittings for leaks annually. Keep the grill grates clean and seasoned to prevent rust. Cover the kitchen or move appliances indoors in heavy winter regions, exposure to freeze-thaw cycles shortens equipment life.
Conclusion
Building a DIY outdoor kitchen is manageable if you respect the details: solid foundation, weather-resistant materials, proper utilities, and honest assessment of what you can DIY versus what needs a pro. Start with the basics, a good grill, level counter space, and storage, then expand as your skills and budget allow. Most of the work is framing, finishing, and assembly: the tricky bits are plumbing and electrical, which are worth outsourcing for safety and code compliance. Take your time, measure twice, and you’ll end up with a kitchen that handles real cooking and real entertaining for years.