An outdoor kitchen station transforms your backyard into a full-service cooking space where you can grill, prep, and entertain without running inside constantly. Whether you’re a weekend griller or a serious outdoor chef, adding a dedicated cooking zone increases both your home’s functionality and resale value. This DIY guide walks you through planning, building, and maintaining an outdoor kitchen station that fits your space and budget. From a simple base setup to a premium build, you’ll find practical steps to get cooking outside this season.
Table of Contents
ToggleKey Takeaways
- An outdoor kitchen station combines a grill, counter space, storage, and utilities into one dedicated zone, eliminating the need to run inside during cooking and entertaining.
- Building an outdoor kitchen station can recoup 50–70% of construction costs when selling your home, significantly increasing property appeal and functional square footage.
- Site selection is critical: choose level ground with proper drainage, and position your grill at least 10 feet from your house, deck, and overhead branches to prevent fire hazards and damage.
- Budget-friendly outdoor kitchen stations range from bare-bones setups ($500–$1,500) with a basic grill and table to premium installations ($5,000–$15,000+) with built-in appliances, water lines, and electrical outlets.
- Proper materials matter: use stainless steel or composite countertops, pressure-treated lumber or steel framing, and galvanized fasteners to withstand outdoor weather and prevent rust and rot.
- Regular maintenance—including monthly grill cleaning, annual surface sealing, and off-season propane and water line management—keeps your outdoor kitchen station functional and appealing for decades.
What Is an Outdoor Kitchen Station and Why You Need One
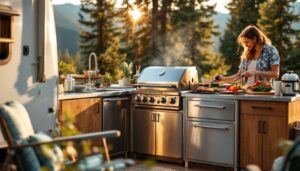
An outdoor kitchen station is a dedicated prep and cooking area in your yard, think built-in grill, counter space, storage, and utilities bundled into one zone. Unlike a standalone grill, a full station keeps everything you need within arm’s reach: propane or natural gas lines, water access, food prep surfaces, and cabinet storage for tools and supplies.
Why build one? First, it eliminates the kitchen-to-yard shuffle. You can sear, chop, and plate food outside without tracking dirt and grill residue through your home. Second, it becomes a gathering point for entertaining, guests hang around the cooking action, and you’re part of the conversation instead of stuck inside. Third, a well-built outdoor kitchen increases your property’s appeal and functional square footage. Many homeowners recoup 50–70% of outdoor kitchen costs when selling, depending on local market conditions and build quality.
Essential Components and Layout Planning
A basic outdoor kitchen needs four core elements: a grill (gas or charcoal), a work surface for prep, storage for tools and fuel, and ideally a sink or water line for cleanup.
Grill selection drives your build. Built-in gas grills (typically 36–48 inches wide) need a permanent frame and gas hookup. Charcoal grills offer flexibility and portability. Either way, choose a heavy-duty model rated for outdoor conditions, thin steel rusts fast in moisture.
Counter space should be at least 18–24 inches deep and positioned on both sides of your grill when possible. Stainless steel or concrete resists staining and weather. Avoid wood for main prep surfaces: it splits and warps outdoors. Marble or granite tops look great but need annual sealing in humid climates.
Storage keeps equipment organized and off-site. Built-in cabinets made from weather-resistant materials (composite boards, stainless steel) outlast wood. Plan for propane tank storage if gas-powered, it needs ventilation and shouldn’t sit against wood framing.
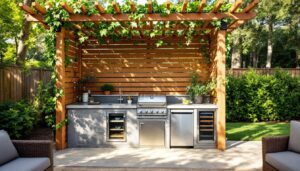
Utilities matter for convenience. A water line running to a small sink or hose bib lets you rinse hands and prep greens. Outdoor electrical (GFCI-protected outlets) powers a warming oven, music system, or lighting. Both require permits and licensed installation in most jurisdictions.
Choosing the Right Location and Foundation
Site selection is non-negotiable. Pick a spot with firm, level ground, ideally gravel, patio, or a concrete pad you’ll pour. Sloped earth settles unevenly and shifts your structure. Avoid low-lying spots where standing water pools: drainage problems rot cabinets and damage gas lines.
Distance matters too. Keep the grill at least 10 feet from your house siding, deck railings, and overhead branches. Gas grills throw heat and sparks: wood structures are at risk. Check local zoning codes, some jurisdictions restrict outdoor cooking structures near property lines or in specific setback distances.
Foundation options: A concrete slab (4–6 inches thick, reinforced with rebar) is the gold standard. You can pour it yourself or hire a concrete contractor. Poured stone or compacted gravel works for smaller, temporary builds. Whatever base you choose, ensure it’s 100% level before installing frames or cabinets, even a 1/4-inch slope causes cabinet doors to swing shut on their own and throws off your grill’s heat distribution.
Budget-Friendly Options: From Basic to Premium
The Bare-Bones Build ($500–$1,500). Start with a quality freestanding gas or charcoal grill on a patio or gravel pad. Add a simple wooden or steel prep table next to it, buy a ready-made outdoor table (36–48 inches wide) rather than building from scratch. Store propane, tools, and supplies in a weatherproof box or cabinet. This setup works for casual grillers and costs minimal labor.
The Mid-Range Setup ($2,000–$5,000). Build a sturdy steel or concrete block frame around your grill, add 4–6 feet of counter space on each side (composite or sealed wood), and install basic cabinets below for storage. Include a hose bib or small bucket sink. This is the sweet spot for most DIYers, enough function without massive expense or permit headaches in many jurisdictions. You’ll spend weekends building, not months planning licensed work.
The Premium Installation ($5,000–$15,000+). Integrate a built-in gas grill, full sink with hot/cold water lines, electrical outlets on GFCI circuits, stone or stainless steel countertops, weather-resistant cabinetry, and possibly a warming drawer or mini-fridge. This requires professional gas and electrical work, permits, and inspections. The payoff is a resort-style space that handles year-round entertaining and raises home value significantly.
Materials, Tools, and Installation Tips
Frame materials: Steel studs or pressure-treated lumber work for structural support. Use nominal 2×4 lumber (actual size 1.5 inches × 3.5 inches) for vertical posts spaced 16 inches on center, just like house framing. If using steel, ensure posts are bolted or welded securely, no shortcuts here. Concrete blocks are another durable option: stack them on a level base and check plumb with a level every few courses.
Countertops: Tile over concrete backer board is affordable and replaceable: use exterior-grade adhesive and grout. Poured concrete can be sealed and looks clean. Stainless steel is durable but cold to the touch and shows fingerprints. Composite boards (plastic lumber) resist rot and won’t splinter, though they sag if unsupported.
Tools you’ll need: A 4-foot level, tape measure, circular saw or miter saw, drill/driver, socket set, and a stud finder. If pouring concrete, rent or buy a concrete mixer. For gas or water hookups, hire licensed pros, DIY gas line mistakes are dangerous and illegal in most places.
Installation sequence: (1) Prepare and level the site. (2) Build the frame, checking plumb and square with a level and tape measure. (3) Install the grill or cooktop. (4) Add side tables and countertops. (5) Build or install cabinets underneath. (6) Arrange power and water if planned.
Pour all concrete bases at least 7 days before loading weight on them. Don’t skip this, premature use causes cracking and settling. Use stainless steel or galvanized fasteners outdoors: regular steel rusts and stains everything around it. Paint wood with exterior-grade stain or sealant annually, one coat every spring keeps it looking sharp and extends its life significantly. Better Homes & Gardens offers seasonal home improvement guidance for projects like this.
Maintenance and Year-Round Use
An outdoor kitchen faces sun, rain, salt spray, and temperature swings. Proper maintenance keeps it functional and looking good for years.
Grill upkeep: Clean the grates after each use with a grill brush while they’re warm. Empty grease traps monthly. If using a gas grill, have the burners and lines inspected yearly by a propane professional. Replace burner covers and grates every 2–3 years if heavily used: they’re one of the first parts to degrade.
Surfaces and cabinet care: Stainless steel counters and cabinet fronts need monthly cleaning with appropriate cleaner (avoid harsh chlorine-based products: they pit stainless). Wooden surfaces benefit from sealing or staining annually before winter. Composite materials are lower-maintenance but shouldn’t sit wet for extended periods, wipe spills promptly. Inspect cabinet bottoms and corners for rust or mold: poor drainage underneath is the culprit.
Off-season storage: In cold climates, disconnect propane tanks and store them upright in a cool, dry location. Cover the grill with a fitted grill cover (breathable, not vinyl that traps moisture). Pull and drain outdoor water lines before frost: frozen water inside lines and faucets cracks them. If you have an outdoor fridge or warming drawer, bring it inside or winterize it per the manufacturer’s instructions.
Winter cooking: An outdoor kitchen doesn’t have to shut down. Many regions enjoy fall and winter grilling under clear, cold skies. Just keep extra propane on hand (cold temps reduce output slightly) and sweep snow off the grill before lighting it. Gardenista provides inspiration for outdoor living spaces year-round.
Conclusion
Building an outdoor kitchen station doesn’t require a contractor’s budget or a year of planning. Start simple, a good grill, a solid prep surface, and safe ground, then expand with water, storage, and utilities as your budget allows. The key is honest site prep, quality materials suited to outdoor weather, and realistic expectations about permits and professional help. Once built, consistent maintenance keeps your setup running and looking sharp for decades. Your backyard cooking zone will quickly become the hub of your entertaining season.