An enclosed outdoor kitchen bridges the gap between indoor comfort and outdoor freedom. Whether you’re tired of weather interruptions, bugs during dinner prep, or the need to dash inside for forgotten utensils, enclosing your outdoor kitchen makes the space usable year-round and extends your entertaining season. This guide explores eight modern enclosure designs, from frameless glass walls to screened pavilions, so you can choose the approach that fits your budget, climate, and lifestyle. Each style balances aesthetics, functionality, and the practical realities of building an outdoor kitchen that actually works.
Table of Contents
ToggleKey Takeaways
- Enclosed outdoor kitchen ideas extend your entertaining season year-round by protecting appliances, countertops, and occupants from weather, UV damage, pests, and temperature fluctuations.
- Frameless glass walls offer maximum light and transparency (at $150–$300 per square foot) but require precision installation by professionals, while sliding glass doors provide more flexibility at a lower cost ($75–$150 per linear foot).
- Screened enclosures are the most budget-friendly option ($25–$60 per square foot) and effectively block pests, but provide minimal wind and cold-weather protection compared to solid structures.
- Solid roof structures like polycarbonate pergolas ($80–$150 per square foot) and full pavilions ($150–$300+ per square foot) deliver genuine year-round weatherproofing and require proper engineering to meet building codes for wind and snow loads.
- Effective enclosed outdoor kitchen design prioritizes workflow, cross-ventilation, GFCI-protected electrical systems, and durable outdoor materials like marine-grade plywood or concrete countertops to ensure long-term functionality.
- Budget allocation should follow roughly 40–50% for structure, 30–40% for enclosure systems, and 10–20% for finishes and systems like lighting, ventilation, and plumbing to avoid leaving projects incomplete.
Why Enclose Your Outdoor Kitchen
Enclosing an outdoor kitchen solves real problems that daydreamers don’t think about until the rain hits mid-grilling session. Year-round usability tops the list: a screened or glassed enclosure extends your cooking season from a few summer months into spring and fall, and even winter in milder climates.
Weather protection is obvious, but there’s more to it. An enclosure shields your appliances and countertops from UV damage, rain, and temperature swings that degrade grills, stone counters, and outdoor cabinetry. That stainless-steel grill you invested in stays functional, not rust-spotted, after three winters.
Pests are a genuine problem for outdoor cooks. Flies, mosquitoes, and wasps ruin a meal faster than a guest can say “is that bug in my food?” A proper enclosure, especially screened options, keeps them out without blocking the outdoor feel.
Finally, an enclosure increases your home’s perceived value and usable square footage. Buyers see a finished, weatherproofed outdoor living space, not just an exposed patio. Local building codes vary on whether an enclosure requires a permit, so check with your jurisdiction before starting. Most jurisdictions treat a fully roofed structure differently than a pergola or screened porch.
Glass Enclosure Designs for Maximum Light
Glass enclosures are the premium choice for homeowners who want the outdoor kitchen to feel like an extension of indoor living. Light floods through, views stay unobstructed, and the space feels expansive rather than boxed-in.
Frameless Glass Walls
Frameless glass walls use large panels (often 10 to 12 feet tall) held by minimal metal framing, typically aluminum or steel channels at the base and top. The visual result is nearly invisible walls, pure transparency with maximum light.
Installation requires precision. The foundation and structural framing must be dead-level and plumb: even ⅛-inch deviation causes panels to bind. Frameless glass isn’t a DIY install unless you’ve done curtain wall work, hire a glazier or custom fabricator. Cost typically runs $150 to $300 per square foot installed, depending on glass type and framing.
Choose tempered safety glass (not standard float glass). Tempered glass shatters into small, relatively safe cubes if broken, meeting building codes. Thickness ranges from ½ inch to ¾ inch: thicker is overkill for most patios but resists wind better in hurricane zones. Verify your local building code, some jurisdictions require additional bracing or insulated glass in enclosed structures.
Frameless glass works beautifully if your outdoor kitchen overlooks a view. If you’re cooking in a backyard surrounded by neighbors’ fences, the transparency becomes a liability.
Sliding Glass Doors and Panels
Sliding glass door and panel systems offer more flexibility than frameless walls. They use standard sliding door hardware (the same mechanism as patio sliders) mounted in aluminum frames, letting you open or close the enclosure as weather and preference dictate.
They’re easier to install than frameless glass because they use standard components. Rough openings need to be square and level, but tolerances are more forgiving. A competent handyman can install a slider system: frameless walls really do need a glazier.
Cost is lower than frameless: $75 to $150 per linear foot depending on slider quality and glass type. A typical outdoor kitchen might need 30 to 40 feet of sliders (three to four walls, depending on layout).
The trade-off: sliding panels create sight lines where frames interrupt the view. For a small enclosed kitchen, that frame-and-panel pattern is noticeable. For a larger space or one set back from the patio, it’s less obtrusive. You also need clear floor space for panels to slide: they won’t work in tight layouts where the outswing (or slide-out track) eats into walkways.
Design tip from resources like Remodelista, which curates kitchen and home design ideas, suggests using frosted or tinted glass in one or two walls if privacy is a concern while maintaining the light-filled aesthetic in others.
Screened Enclosures for Budget-Friendly Options
Screened enclosures are the pragmatic choice for homeowners who want pest and debris protection without the cost or visual weight of glass. Screen lets light and air through, keeps bugs out, and costs a fraction of glazing.
Aluminum screen frame kits are available for DIY installation. Brands like Pella or Eze-Breeze make modular systems where you snap screen panels into pre-assembled frames. A handy homeowner can assemble and install these in a weekend, though you’ll still need a level and square foundation.
Cost ranges from $25 to $60 per square foot for materials and simple labor, making it one of the cheapest enclosure options. Maintenance is minimal: rinse the screen occasionally, and replace torn mesh (a $50-$200 repair) every 5 to 10 years depending on climate.
The downsides: screens reduce light (you lose maybe 10-15% brightness depending on mesh color), and they don’t provide wind or cold weather protection like solid structures. In winter, a screened kitchen is still cold. For year-round use in harsh climates, screened enclosures are a stepping stone, not a final solution.
Pro tip: Use 18-gauge aluminum mesh for cooking areas. It’s heavier and more durable than standard 20-gauge, resists damage from heat and flying sparks, and lasts longer. The Summer Living Room article from Gardenista showcases beautifully furnished screened porches that demonstrate how these enclosures create inviting outdoor rooms.
If you’re building from scratch, ensure your frame structure (posts, beams, roof) is rated for the wind load in your zone. Local building codes specify wind speeds: for reference, most residential zones require 90 mph design speeds minimum, some up to 150 mph in coastal areas. Your framing engineer or contractor will size posts and connections accordingly.
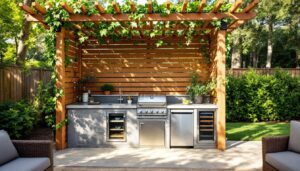
Solid Structures: Pergolas and Pavilions
Solid roof structures, pergolas with polycarbonate panels or full pavilions, offer genuine weather protection and year-round usability. A pergola has open slats overhead (allowing some rain and light through): a pavilion has a solid roof (usually standing-seam metal, metal shingles, or polycarbonate).
Polycarbonate pergolas use translucent UV-blocking panels (often twin-wall or multi-wall cores) mounted over open-beam framing. Light and some heat diffuse through, but you stay dry. Cost is moderate: $80 to $150 per square foot installed, and it’s installable by a motivated DIYer if framing skills and carpentry tools are in your toolkit.
Framework must be pressure-treated lumber (for outdoor durability) with properly sized joists and beams. For a typical 12×16-foot kitchen, you’re looking at 6×6 or 6×8 posts, 2×10 beams, and 2×8 joists spaced 16 inches on center. (Nominal sizes: actual dimensions are about ¾ inch smaller.) Wind loading, snow load, and your local span tables will refine exact sizing. This is not a guess-and-build situation, undersized framing can collapse. Consult a structural engineer or use span-rating software if you’re uncertain.
Full pavilions have solid roofs, standing-seam steel, metal shingles, or corrugated polycarbonate. They’re weatherproof, keep heat in winter, and look like a finished structure rather than a temporary shade frame. Cost is higher: $150 to $300+ per square foot for roof and structural framing, but you’re building something that feels like real architecture.
Both structures typically require a building permit and inspection, particularly if roofed. Local codes regulate roof load calculations, structural fastening, electrical runs for ceiling lights, and foundation requirements (concrete footings below frost line, critical to prevent frost heave that cracks posts and shifts framing).
If your kitchen includes a gas grill inside the structure, ensure adequate ventilation. Your local fire code specifies clearances above grills (usually 36 to 48 inches to combustible materials) and ventilation requirements. Unvented propane or natural gas appliances can create carbon monoxide hazards indoors: outdoors, you need air movement. A range hood vented to the side or soffit is standard practice based on design guidance from The Kitchn, which covers kitchen ventilation and appliance selection in detail.
Layout and Functionality Tips
Enclosing an outdoor kitchen isn’t just about adding walls and a roof. The layout determines whether you have a functional, pleasant space or a claustrophobic kitchen where two people can’t pass without bumping elbows.
Workflow and traffic flow matter. Your outdoor kitchen should mirror indoor kitchen logic: work triangle between grill, sink (if included), and prep table. Keep the grill away from walkways: nothing ruins a meal like a guest taking heat and smoke while walking to the seating area. Allow at least 36 inches of clearance on the front and sides of the grill for safe operation. If space is tight, put the grill at one end, prep and sink at the other, with seating beyond the enclosure.
Ventilation is non-negotiable. An enclosed kitchen collects heat and smoke fast. Cross-ventilation (windows or vents on opposite walls) helps, but don’t rely on it alone if you’re running a powerful grill. Install exhaust fans or range hoods designed for outdoor use (stainless-steel construction, grease filters). Size the fan to your space: a rough rule is 1 cfm (cubic feet per minute) per square foot of kitchen area, but your local code may specify more for cooking appliances. A 200-square-foot kitchen with a high-output grill might need a 300-400 cfm hood.
Materials must withstand humidity and temperature swings. Outdoor cabinetry uses marine-grade plywood or teak, not standard home depot cabinets. Countertops should be concrete, granite, or stainless steel, anything porous (like wood) rots in wet climates. Interior walls, if you add them, need moisture barriers and paint rated for damp outdoor use. Gaps and caulk joints will fail without flexibility: use polyurethane or silicone caulk rated for exterior use and temperature cycling, not standard latex.
Lighting extends usability into evening. Plan for both task lighting (overhead above the grill and prep areas) and ambient lighting (soffit or recessed fixtures for general illumination, LED string lights or sconces for ambiance). Wire before you enclose if possible: running electrical through existing walls is messy. All outdoor receptacles should be GFCI-protected (ground fault circuit interrupter) per electrical code. If you’re not confident with outdoor wiring, hire a licensed electrician, code compliance isn’t optional, and mistakes with outdoor circuits can be fatal.
Budget for finishes and details. Once the structure is up, homeowners often run short on funds for quality doors, ventilation, lighting, and interior finish. These details transform a DIY shed into a polished kitchen. Plan your budget to allocate roughly 40-50% to structure, 30-40% to enclosure (doors, windows, screens), and 10-20% to finishes and systems (HVAC, lighting, plumbing). Skipping finishes leaves you with a good bones but unfinished project.