Compact camping has evolved beyond basic tent trips. Today’s small campers with outdoor kitchens deliver restaurant-quality cooking and genuine comfort in a mobile footprint. Whether you’re a weekend warrior escaping city life or a full-time nomad, integrating an outdoor kitchen into a small camper setup transforms how you travel and eat on the road. This guide walks you through selecting the right camper, outfitting an outdoor kitchen, and maintaining both systems so they work together seamlessly for years of hassle-free adventures.
Table of Contents
ToggleKey Takeaways
- A small camper with an outdoor kitchen solves space constraints and cooking inefficiency by moving meal prep outdoors, reclaiming interior living space while enabling restaurant-quality meals on the road.
- Prioritize dry weight (3,500–6,000 lbs for 18–24 ft models), pre-plumbed outdoor galley space, and weatherproof cabinetry when selecting a compact camper setup.
- A functional DIY outdoor kitchen costs under $500 with portable burners ($50–$200), stainless steel side counters ($150–$400), and water systems ($60–$150), allowing flexibility to upgrade over time.
- Regular maintenance—monthly burner inspections, stainless steel polishing, GFCI testing, and seasonal hose draining—prevents costly repairs and extends equipment life in harsh outdoor conditions.
- Have a backup cooking plan for weather disruptions, such as a covered dining area or indoor hot plate, to keep trips enjoyable when rain, wind, or extreme cold prevents outdoor cooking.
Why Choose a Small Camper With an Outdoor Kitchen
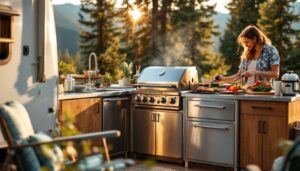
A small camper with an outdoor kitchen solves a real problem: cooking in a tiny interior space is cramped, hot, and leaves lingering food smells in your sleeping area. By moving meal prep and cooking outdoors, you reclaim interior square footage for relaxation and rest, while creating a natural gathering space for family or friends.
Outdoor kitchens also extend your camping season. Fall and spring trips feel less claustrophobic when you’re not crowded around a stove indoors. Many campers discover they spend more time cooking and entertaining outdoors, a simple burner and counter space can replace weeks of takeout and mediocre campground meals.
Cost-wise, a compact setup is more affordable than a sprawling RV. Smaller campers get better fuel economy, fit in tighter campground lots, and are easier to tow or drive solo. An integrated outdoor kitchen doesn’t require running propane lines through living quarters, keeping your interior fresh and safer.
Essential Features to Look For
When shopping for a small camper with outdoor kitchen capability, prioritize three factors: dry weight relative to your tow vehicle, integrated or pre-plumbed outdoor galley space, and weatherproof cabinetry designed for temperature swings.
Dry weight matters. A typical small camper (18–24 feet) ranges from 3,500 to 6,000 pounds, depending on construction. Check your vehicle’s payload and towing capacity in the owner’s manual, not just the maximum towing figure, but actual tongue weight, which should be 10–15% of total trailer weight.
Look for models with fresh water tanks sized for your typical trip length (25–75 gallons is common for compact setups). Waste tanks should match or exceed fresh capacity. If the camper doesn’t include an outdoor kitchen, verify there’s a dedicated hose hookup and electrical outlet within 15 feet of the proposed cooking area.
Layout and Space Optimization
Interior layout determines how livable your camper feels. In a small footprint, a kitchen-booth-bed combo works better than separate sleeping quarters. Look for a convertible dinette that folds into sleeping space, or a jackknife sofa that saves floor area.
Storage is hidden gold. Campers with under-bed compartments, overhead cabinets, and exterior wet bays let you stow gear and cooking equipment without cluttering living space. A slide-out pantry or narrow pull-out drawer is worth the extra cost, it beats rummaging through deep cabinets every meal.
Ventilation and windows matter more than decorative skylights. Cross-ventilation (windows on opposite sides) prevents condensation and odors from lingering. High ceilings (6’3″ or better) make compact interiors feel spacious: anything under 6 feet will feel cramped on rainy days.
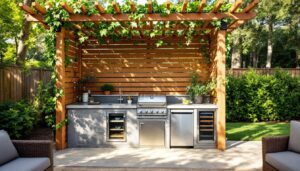
DIY Outdoor Kitchen Setup for Your Camper
If your camper doesn’t come with an outdoor kitchen, a basic setup is manageable for weekend builders. You’ll need a portable burner unit (propane or butane), a fold-out side table or prep counter, storage bins for utensils and dry goods, and a water system (gravity-fed jug or portable hand-pump sink).
Start by securing a propane-powered portable cooktop (two-burner models cost $50–$200 and operate on standard camping canisters or a small tank). Place it on a heat-resistant surface, never on wood or plastic directly. A stainless steel side counter (available as fold-out units from most RV suppliers) gives you prep space and costs $150–$400 new, though you can build one from treated lumber and metal for less.
Water access determines cooking flexibility. If your camper has exterior plumbing, hook directly to your fresh tank. Otherwise, a collapsible water jug (5–10 gallons) and a simple hand-pump sink ($60–$150) let you rinse dishes and prep ingredients without breaking camp connections.
Storage bins labeled for cooking gear, spices, oils, and dishware keep everything organized. Clear plastic bins make it easy to find what you need. A hanging organizer attached to your camper’s exterior wall holds small tools, dish towels, and napkins.
Budget-Friendly Installation Tips
You can assemble a functional outdoor kitchen for under $500. Prioritize what you actually cook. Weekend breakfast folks need a reliable burner and griddle surface. Dinner cooks should invest in a cooktop with oven capability (compact models exist for $200–$400).
Skip the permanent build for now. Portable equipment lets you upgrade or replace components without rewiring or unbolting from your camper. Buy used stainless steel prep tables from restaurant supply auctions or Facebook Marketplace, expect to pay half retail.
Make a simple counter from untreated lumber and an old door or shelf. Brace it securely so it won’t collapse when wet. Coat it with marine-grade sealant (two coats minimum) to handle moisture and UV exposure. Real-world cooking: recent DIY project tutorials show step-by-step builds for outdoor kitchen counters that cost under $100 in materials.
For plumbing, use food-safe garden hose and secure it with stainless clamps, regular clamps rust in salt air or humid climates. Keep hoses short (under 25 feet) so water doesn’t cool excessively in summer or freeze in shoulder seasons.
Electricity is optional but useful. If your camper has a 30-amp shore power hookup, run a single heavy-gauge outdoor extension cord (12 AWG, rated for wet locations) to a weatherproof outlet near your kitchen. Never use standard indoor outlets outdoors, they don’t handle moisture safely. A GFCI (ground fault circuit interrupter) breaker or outlet is required by code in any wet location and costs $15–$25.
Install a propane leak detector if you’re running a fixed tank near your cooking area. Check all connections monthly with soapy water, bubbles indicate a leak. Keep a small fire extinguisher (Class B, for liquid fires) within arm’s reach of your burners. This isn’t optional: propane fires are dangerous in tight camper-adjacent spaces.
Maintenance and Care
Outdoor kitchen gear takes weather abuse. After each trip, drain propane tanks and water lines. In freezing climates, residual water in hoses becomes ice: blowing out lines with compressed air prevents splits. Stow hoses indoors or in insulated storage during off-season.
Inspect your portable cooktop monthly. Check burner openings for spiderwebs, dead insects, or mineral buildup from water vapor. A soft brush clears most debris: use a straightened paperclip or specialized burner cleaning tool for stubborn ports. Replace any burner that won’t ignite evenly.
Stainless steel prep tables look great but require care. Salt spray and hard water leave spotting. Wipe down after each use with a microfiber cloth and fresh water. Monthly, clean with a stainless steel polish to prevent oxidation. Avoid abrasive scrubbers, they scratch the finish and create rust starting points.
GFCI outlets and extension cords degrade faster outdoors. Test your GFCI monthly using its built-in test button (you’ll feel a click). If it doesn’t trip and reset, replace it. Inspect extension cords before each trip for cracks, splits, or burned insulation. Coil them loosely to prevent kinking: tight coils generate heat and damage insulation.
Propane systems need annual attention. Have a certified propane technician inspect your regulator, fittings, and tank. Most need recertification every 10 years. Small tanks used for camping may bypass this if they’re portable and not fixed to the vehicle, but larger auxiliary tanks mounted on your camper do require certification, check your local propane code.
Water systems develop algae and mineral deposits. In spring, flush your fresh water tank completely and add a tank cleaning solution (available at RV stores, about $12–$20). Run treated water through all lines, then flush with several fresh tanks’ worth of plain water. If you see cloudiness, sediment, or odors, repeat the process.
Small space living requires realistic expectations. Your outdoor kitchen won’t function in high winds, heavy rain, or extreme cold. Have a backup plan: a covered dining area, a simple indoor hot plate, or nearby campground amenities. Building resilient systems, redundant burners, backup water, flexible cooking methods, keeps trips enjoyable when weather disrupts your primary setup.
Regions with harsh winters should store equipment indoors. Modern small space living ideas cover storage solutions that keep gear organized and dry year-round. A simple plastic shed, garage corner, or storage locker protects propane, stainless steel, and hoses from freeze-thaw cycles that corrode and damage.
Conclusion
A small camper with an outdoor kitchen isn’t a luxury, it’s a practical solution for comfortable, affordable travel. Whether you buy a fully integrated model or build a portable setup over a season, the payoff is eating well, living comfortably, and enjoying the outdoors without feeling cramped. Start simple, maintain regularly, and adjust based on real trips. Your future camping self will thank you.